Introduction: Why Replace Your Recessed Lighting?
How to replace recessed lighting? Recessed lighting, often referred to as “can lights,” is a popular choice for modern homes due to its sleek design and ability to blend seamlessly into ceilings. However, like any other fixture, recessed lights can become outdated, inefficient, or damaged over time. Whether you’re looking to upgrade to energy-efficient LED fixtures, change the style of your lighting, or address flickering or malfunctioning lights, replacing recessed lighting is a manageable DIY project that can significantly enhance your space.
In this comprehensive guide, we’ll walk you through everything you need to know about replacing recessed lighting. From planning and preparation to installation and troubleshooting, we’ll cover each step in detail. By the end of this article, you’ll have the confidence and knowledge to tackle this project safely and effectively, ensuring your home is illuminated with the perfect lighting solution.

Part 1: Planning Your Replacement – Assessing Needs and Choosing Fixtures
Level 1: Evaluating Your Current Setup
How to replace recessed lighting? Before diving into the replacement process, it’s essential to assess your existing recessed lighting setup. Understanding what you currently have will help you determine the best course of action for the replacement.
- Inspect the Housing: Check whether your recessed lights are part of an old-style incandescent system or a newer LED-compatible one. Older housings may not support modern LED fixtures without modifications.
- Measure the Size: Recessed lights come in various sizes, typically ranging from 4 to 6 inches in diameter. Measure the cutout hole in your ceiling to ensure compatibility with your new fixture.
Level 2: Selecting the Right Fixtures
Choosing the right replacement fixtures is crucial for achieving the desired aesthetic and functionality. Consider both practical and stylistic factors when making your selection.
- Energy Efficiency: Opt for LED recessed lights, which consume less energy and last significantly longer than traditional incandescent or halogen bulbs. Look for ENERGY STAR-rated options for maximum efficiency.
- Trim Styles: Decide on the trim style that suits your decor—options include baffle trims (textured for reduced glare), reflector trims (for brighter light), and adjustable gimbal trims (for directional lighting).
Part 2: Tools and Materials – Gathering What You Need
Level 1: Essential Tools
Having the right tools on hand ensures a smooth and efficient replacement process. Here’s a list of the essentials:
- Screwdriver: Both flathead and Phillips-head screwdrivers are necessary for removing and securing fixtures.
- Wire Strippers and Pliers: These tools are vital for handling electrical wires safely and efficiently.
- Voltage Tester: Always use a voltage tester to confirm that the power is off before working on any electrical components.
Level 2: Required Materials
In addition to tools, you’ll need specific materials to complete the replacement successfully.
- New Fixture Kit: Ensure your new recessed light kit includes all necessary components, such as the housing, trim, and bulb.
- Electrical Tape and Wire Nuts: These are used to secure wire connections and prevent exposed wires from causing hazards.
Part 3: Safety First – Preparing for the Replacement
Level 1: Turning Off the Power
Safety should always be your top priority when working with electrical systems. Follow these steps to ensure a safe working environment:
- Locate the Circuit Breaker: Identify the breaker that controls the power to the recessed lights you plan to replace. Switch it off to cut electricity to the circuit.
- Double-Check with a Voltage Tester: Even after turning off the breaker, use a voltage tester to confirm there’s no live current running to the fixture.
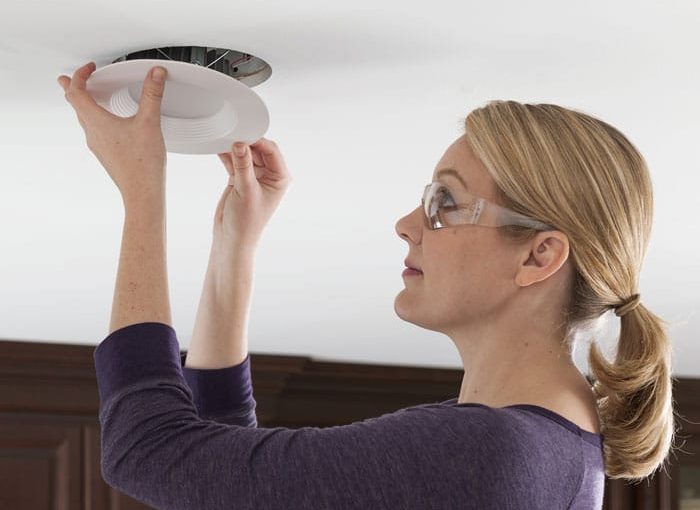
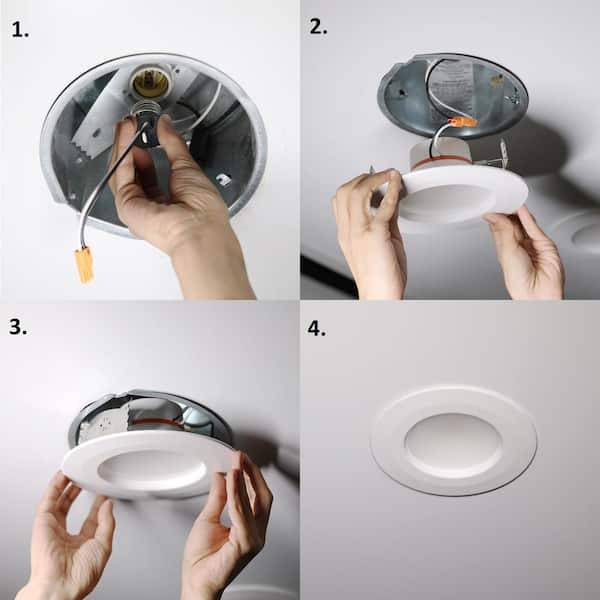
Level 2: Removing the Old Fixture
Once the power is off, you can begin removing the existing recessed light. This step requires care to avoid damaging the surrounding ceiling.
- Remove the Trim and Bulb: Start by unscrewing or gently pulling down the trim ring and removing the bulb. Some trims may snap into place, so handle them carefully.
- Detach the Housing: Unscrew the housing from the ceiling and gently lower it, exposing the wiring inside.
Part 4: Installation Process – Installing the New Fixture
Level 1: Connecting the Wires
Properly connecting the wires is critical for ensuring the new fixture functions correctly and safely.
- Match Wire Colors: Connect the black (hot) wire from the fixture to the black wire in the ceiling, and the white (neutral) wire to the corresponding white wire. Secure the connections with wire nuts and wrap them with electrical tape for added safety.
- Ground the Fixture: Attach the green or bare copper ground wire from the fixture to the grounding wire in the ceiling, ensuring a secure connection.
Level 2: Securing the Housing and Trim
After wiring, the next step is to secure the new housing and attach the trim.
- Mount the Housing: Push the housing back into the ceiling cavity and secure it using the provided brackets or clips. Ensure it sits flush with the ceiling surface.
- Install the Trim and Bulb: Snap the trim into place around the housing and insert the bulb. Make sure the bulb wattage matches the fixture’s specifications to prevent overheating.
Part 5: Testing and Troubleshooting – Ensuring Everything Works
Level 1: Testing the New Fixture
Once the installation is complete, it’s time to test your new recessed lighting to ensure it’s functioning properly.
- Restore Power: Return to the circuit breaker and turn the power back on for the circuit.
- Check the Light: Flip the switch to see if the light turns on. If it doesn’t, double-check your wiring connections and ensure the bulb is properly seated.
Level 2: Addressing Common Issues
If you encounter problems during testing, here are some common troubleshooting tips:
- Flickering Lights: Flickering can result from loose wire connections or incompatible dimmer switches. Tighten all connections and verify that your dimmer is rated for LED use if applicable.
- No Power to the Fixture: If the light doesn’t turn on at all, recheck the circuit breaker and ensure the wires are connected correctly. A faulty bulb could also be the culprit, so try replacing it.

Conclusion: Enjoy Your Upgraded Lighting
How to replace recessed lighting? Replacing recessed lighting is not just about swapping out old fixtures for new ones—it’s also an opportunity to elevate your home’s ambiance, functionality, and overall design. With a few creative enhancements, you can transform your recessed lighting into a standout feature that complements your lifestyle and aesthetic preferences. Modern recessed lighting systems offer exciting possibilities when paired with smart home technology. By integrating smart features, you can enjoy unparalleled convenience and customization. Recessed lighting works best when used as part of a layered lighting strategy. Combining different types of lighting enhances both functionality and visual appeal.
Dust and debris can accumulate on recessed lights over time, reducing their brightness and potentially causing overheating. Regular cleaning keeps them looking and performing their best. Even high-quality recessed lights may experience issues over time due to wear and tear or environmental factors. Proactive troubleshooting prevents small problems from escalating.
How to replace recessed lighting? Replacing recessed lighting may seem daunting at first, but with careful planning, the right tools, and attention to safety, it’s a project that most homeowners can complete successfully. By upgrading to modern, energy-efficient fixtures, you not only enhance the look and feel of your space but also reduce energy consumption and maintenance costs. Whether you’re aiming for a brighter kitchen, a cozier living room, or improved task lighting in your workspace, recessed lighting offers endless possibilities. So roll up your sleeves, follow this guide, and enjoy the satisfaction of transforming your home with beautifully updated lighting!